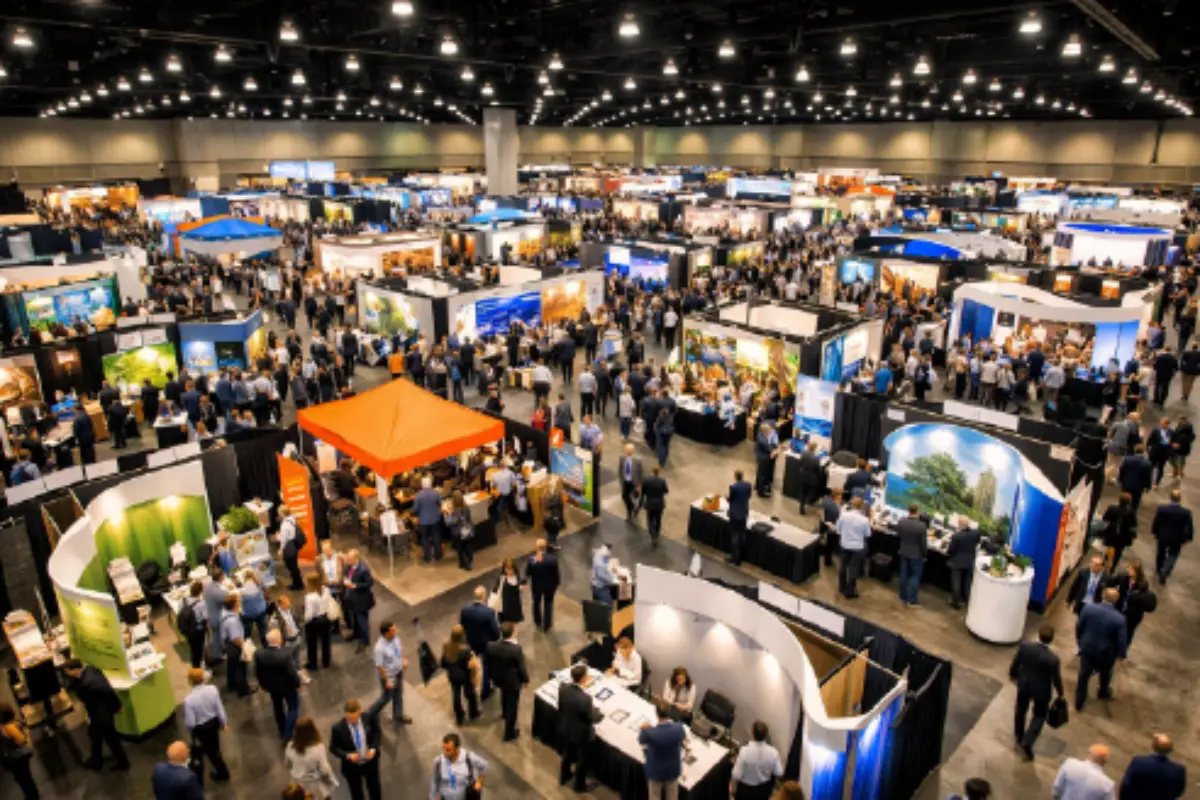
Trade shows remain one of the most powerful marketing channels available to businesses of any size. According to Branded Canopy Tents, 82% of trade show attendees have direct buying power — meaning the people walking the floor are decision-makers ready to invest. The average attendee spends 8.3 hours exploring exhibits, giving your brand ample face time with qualified prospects. But here’s the catch: you only get that time if your booth stops people in their tracks. Research from the Trade Show Exhibitors Association (via StaplesPromo) shows that booths with well-designed traffic flow generate 42% more meaningful engagements than those thrown together at the last minute. That’s the difference between a weekend of handshakes and a weekend of collecting qualified leads. Whether this is your first trade show or your fiftieth, this guide walks you through every phase of booth setup — from initial planning months in advance to post-show follow-up. Consider it your complete playbook for making 2026 your most successful trade show season yet.
Phase 1: Pre-Show Planning (3–6 Months Out)
Successful trade show booths are not built the week before the event. According to the Freeman
first-time exhibitor checklist, companies should start planning three to six months ahead of any show to ensure they have time for design, production, logistics, and staff preparation.
Define Your Goals
Before you pick out displays or design a layout, get clear on what success looks like. Are you aiming to generate leads? Launch a new product? Build brand awareness in a new market? Your goals will drive every decision that follows — from booth size to staffing to which show materials you order. Write your goals down and make them specific. “Generate 150 qualified leads” is a more actionable target than “get more visibility.”
Set Your Budget
According to the Center for Exhibition Industry Research (CEIR) via StaplesPromo, companies allocate roughly 40% of their trade show budgets to exhibit space and design. The remaining 60% covers travel, shipping, staffing, promotional materials, lead capture technology, and follow-up campaigns. Map out every line item early. Common budget categories include:
- Booth space rental and fees
- Display hardware (tents, backwalls, banner stands, tablecloths, flags)
- Graphic design and printing
- Shipping and drayage
- Travel and accommodations for staff
- Promotional items and giveaways
- Lead capture tools or apps
- Electricity, Wi-Fi, and AV rentals
Choose Your Booth Type
Your booth type depends on your budget, goals, and the show floor layout. Inline booths (one open side) are the most common and affordable. Corner and peninsula booths offer two or three open sides for better foot traffic. Island booths — open on all four sides — deliver the most visibility but require a larger investment. When selecting your location, request spots near entrances, food courts, and main aisles where natural foot traffic is highest.
Phase 2: Design Your Booth Layout
Layout is where strategy meets design. A booth that looks beautiful but confuses visitors will underperform one that guides people naturally from curiosity to conversation.
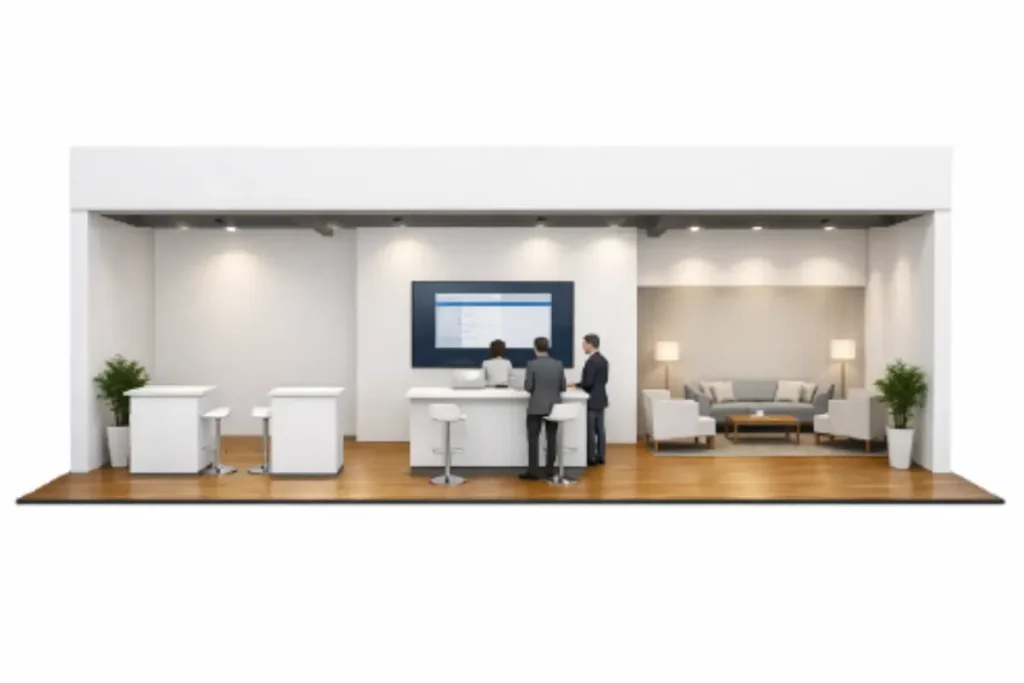
Create Three Zones
Think of your booth space in three zones:
1 Attract Zone (outer perimeter): This is what attendees see from the aisle. Bold graphics, prominent signage, and engaging visuals pull people in. Your primary messaging should be visible from 20 feet away or more, according to StaplesPromo. If someone walking by can’t immediately understand what you do, you’ve lost them.
2 Engage Zone (middle area): Once someone steps in, this zone gives them something to interact with — product demos, touchscreens, samples, or a brief conversation with a team member. Booths with interactive technology see 42% higher engagement, according to research from the Exhibition and Event Association (via StaplesPromo).
3 Convert Zone (inner area): This is where the real conversations happen. A semi-private space — even just a small table with two chairs — where your team can sit down with interested prospects, capture their information, and discuss next steps.
Prioritize Sightlines and Open Layouts
Avoid cluttering the front of your booth with tables, racks, or freestanding displays that block the view
inside. Open layouts invite people in. When attendees can see activity happening inside the booth — a demo in progress, a group of people engaged in conversation — they’re more likely to stop. Position your tallest displays toward the back so they serve as a backdrop, not a barrier. Keep the entrance wide and welcoming. If you have a 10×10 space, resist the urge to fill every square foot. Breathing room signals confidence and makes your booth more comfortable to enter.
Phase 3: Choose Your Display Components
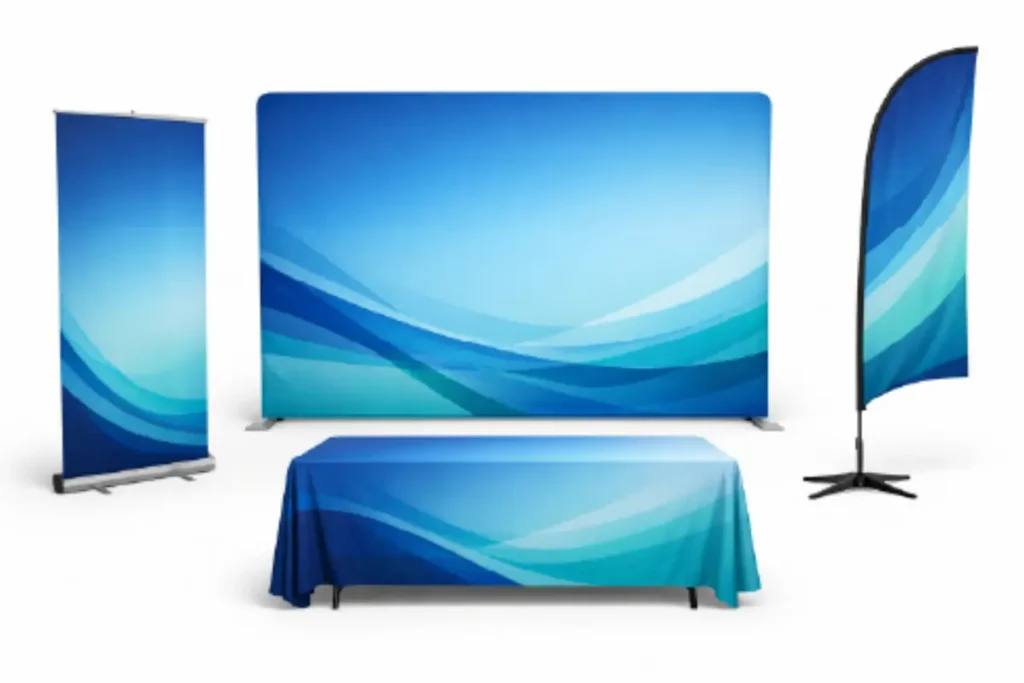
The physical elements you bring to the show are your brand’s handshake with the world. Each display component serves a specific purpose, and choosing the right combination can dramatically increase your visibility and professionalism.
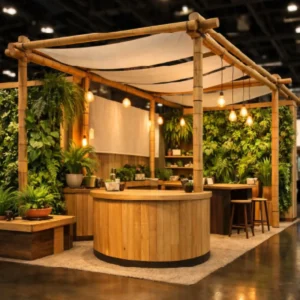
Tents
If your event is outdoors or in a semi-covered venue, a custom pop-up tent anchors your space and makes your brand impossible to miss. Canopy tents provide shelter, shade, and a defined footprint that attendees recognize from a distance. Custom-printed tent canopies and sidewalls turn your structure into a 360-degree brand billboard.
Backwall Displays
A strong backwall display is the foundation of most indoor booth setups. It defines your space, anchors your branding, and provides the visual backdrop for every conversation that happens in your booth. Fabric tension displays, retractable walls, and modular panel systems all offer clean, professional presentation. According to Branded Canopy Tents, 67% of attendees remember standout exhibits — and a sharp backwall is often what makes a booth stand out in memory.
Banner Stands
Banner stands are the workhorses of trade show marketing. Lightweight, portable, and easy to set up in seconds, retractable banner stands are ideal for flanking your booth entrance, highlighting key products, or reinforcing your call to action. They’re also easy to reuse across multiple events, making them one of the best long-term investments in your display toolkit.
Tablecloths
A brandedtablecloth is one of the simplest upgrades that makes a disproportionate impact. A plain folding table says “afterthought.” A fitted, custom-printed tablecloth with your logo and brand colors says “we take this seriously.” Strategic color selection increases brand recognition by up to 80%, according to the Color Marketing Group (via StaplesPromo), and branded tablecloths are one of the easiest places to put color to work.
Flags
Feather flags and teardrop flags add vertical presence and movement to your booth. Because they sit
above head height, they act as wayfinding markers on a crowded show floor — helping attendees spot your booth from several aisles away. They’re especially effective outdoors or in large convention halls where booths can blend together.
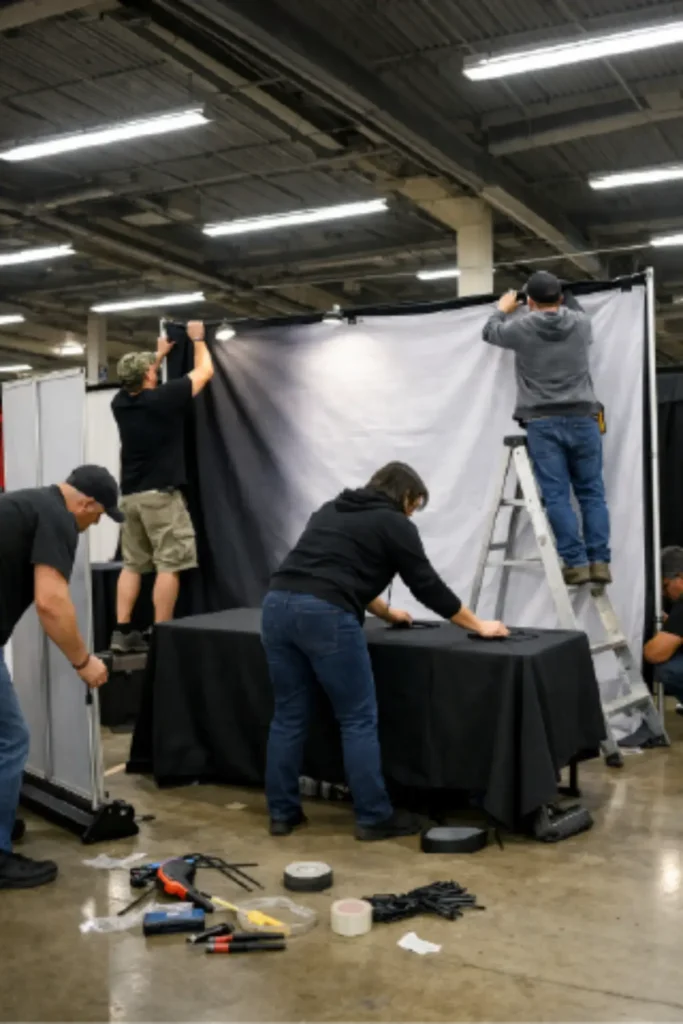
Phase 4: The Setup Day Checklist
The day before or morning of the show can be chaotic. Having a detailed checklist ensures nothing
gets left in the truck — or worse, back at the office. Here’s a step-by-step setup sequence:
1 Arrive early. Give yourself at least two hours more than you think you need. Unexpected delays — freight, elevator queues, missing supplies — are the rule, not the exception.
2 Inspect your space. Confirm your booth dimensions, electrical outlet locations, and any shared walls with neighboring exhibitors.
3 Lay your flooring (if applicable). Carpet, foam tiles, or branded floor graphics go down first.
4 Set up your tent or backwall structure. Assemble the largest piece first to establish the footprint.
5 Position tables and furniture. Arrange them according to your layout plan, keeping the entrance clear and open.
6 Dress your tables. Apply branded tablecloths and arrange product displays, brochures, and business card holders.
7 Deploy banner stands and flags. Position banner stands at the booth entrance or flanking the backwall. Set flags at the perimeter for maximum visibility.
8 Connect power, lighting, and technology. Test all electronics — monitors, tablets, lead capture devices, and chargers. Proper lighting can increase booth engagement by up to 48%, according to the International Association of Lighting Designers (via StaplesPromo), so don’t treat it as an afterthought.
9 Stock promotional materials. Arrange giveaways, brochures, catalogs, and product samples in accessible but organized positions.
10 Do a final walkthrough. Stand in the aisle and look at your booth the way an attendee would. Is your message clear from 20 feet? Is the entrance inviting? Is everything straight, clean, and branded?
Don’t Forget to Pack
- Zip ties, Velcro strips, and gaffer tape
- Extension cords and power strips (with surge protection)
- A basic tool kit (screwdriver, pliers, scissors, box cutter)
- Extra business cards
- Cleaning supplies (lint roller, glass cleaner, paper towels)
- Snacks and water for your team
- A backup phone charger and portable battery pack
- A printed copy of your booth layout and setup instructions
Phase 5: During the Show
Your booth is set. The doors are open. Now the work really begins.
Staff Your Booth Strategically
Never leave your booth unattended — even during slow hours. Schedule shifts so your team stays fresh and energized. Two engaged staffers are more effective than four tired ones. Everyone working the booth should know your key talking points, your goals for the event, and how to use your lead capture system. Position one team member near the front of the booth to greet passersby and start conversations. Avoid sitting behind a table; standing and making eye contact is far more inviting.
Capture Leads Efficiently
Use a digital lead capture app or badge scanner instead of relying on a fishbowl full of business cards. Digital tools let you add notes about each conversation in real time — what the prospect was interested in, their timeline, and their level of buying intent. This makes follow-up dramatically more effective.
Qualify leads as you collect them. A simple rating system — hot, warm, cool — helps your sales team prioritize outreach after the show.
Keep the Energy Up
Engage attendees with live demos, quick contests, or hands-on product experiences. People gravitate toward booths where something is happening. Rotate activities throughout the day to keep things fresh.
Take photos and short videos for social media recaps and future show planning.
Phase 6: Post-Show Follow-Up
The show doesn’t end when the lights go off. Follow-up is where trade show investments pay off — or don’t.
Follow Up Within 24–48 Hours
Speed matters. Reach out to every lead within 24 to 48 hours while the event is still fresh in their minds. Personalize your outreach based on the notes your team captured during the show. Reference specific conversations, products they expressed interest in, or challenges they mentioned. Hot leads should receive a direct call or personalized email. Warm leads can enter a follow-up email sequence. Cool leads go into your long-term nurture pipeline.
Review Your ROI
Go back to the goals you set in Phase 1 and measure your performance against them. How many leads did you collect? How many were qualified? What was your cost per lead? How did the show
compare to previous events?
Document what worked and what didn’t. Which display components drew the most attention? Which
conversations converted? This review becomes the foundation for your next trade show plan.
Download Your Free Trade Show Checklist
Want all of this in a single, easy-to-reference document? We’ve created a free downloadable trade show checklist covering every phase from pre-show planning to post-show follow-up. Print it, share it with your team, and check off each step as you go.
Request your free trade show checklist here.
Let Zodiac Event Displays Build Your Booth
Setting up a trade show booth that drives real results takes planning, the right display components, and attention to detail. At Zodiac Event Displays, we help businesses across Denver and beyond create custom trade show setups that look sharp, set up fast, and make a lasting impression. From custom pop-up tents and backwall displays to banner stands, tablecloths, and flags — we handle the design, printing, and production so you can focus on what you do best: connecting with your next customer.
Ready to start planning your 2026 trade show season? Get in touch with our team and let’s build
something that turns heads.
 Previous reading